
Our simple and free solution to help you keep an overview of all the MS Planner Tasks present in your Microsoft365 Tenant.

The problem
If you are a CEO, department head, controller, team or project manager and using Microsoft Planner together with yours employees, you certainly know this problem:
How can I quickly and effectively get an overview of all tasks of all employees in all teams and groups?
- Out of the box, there is no way to do this.
- You have to navigate awkwardly into each individual plan.
- It is not possible to display the tasks of multiple plans sorted or filtered by criteria such as priority, status or due date in one overview.
That was yesterday. Today is TaskPort time!
- See all tasks from all plans you have access to in a single overview.
- Filter and sort tasks by any criteria such as status, priority, employee, team, bucket, label, etc.
- Save any number of recurring filter configurations.
- Pin the TaskPort app to your Microsoft Teams sidebar and take advantage of TaskPort without leaving Teams.
- Export the data to a Microsoft Excel spreadsheet.
- Customize the appearance of the TaskPort spreadsheet to suit your needs.
Have a closer look
Get an idea by viewing some screenshots here.

Get TaskPort Now
Good News first – You can use TaskPort FOR FREE!
TaskPort App is our free benefit for our present – or maybe future – customers!
If your are excited – just tell others and check out our further solutions.
Use TaskPort in Browser
Just use or bookmark the link to TaskPort
app.conport.de/taskport
sign in with your M365 Account and you´re done!
Load the TaskPort Teams-App
Get the most convenient experience by integrating TaskPort inside your Microsoft Teams Environment!
Search for TaskPort at your Teams App Store, install as a custom app and pin it to your sidebar.
Notice: loading third party apps and pinning to sidebar must be enabled for your organisation. In case of doubt contact your local admin.
User Documentation
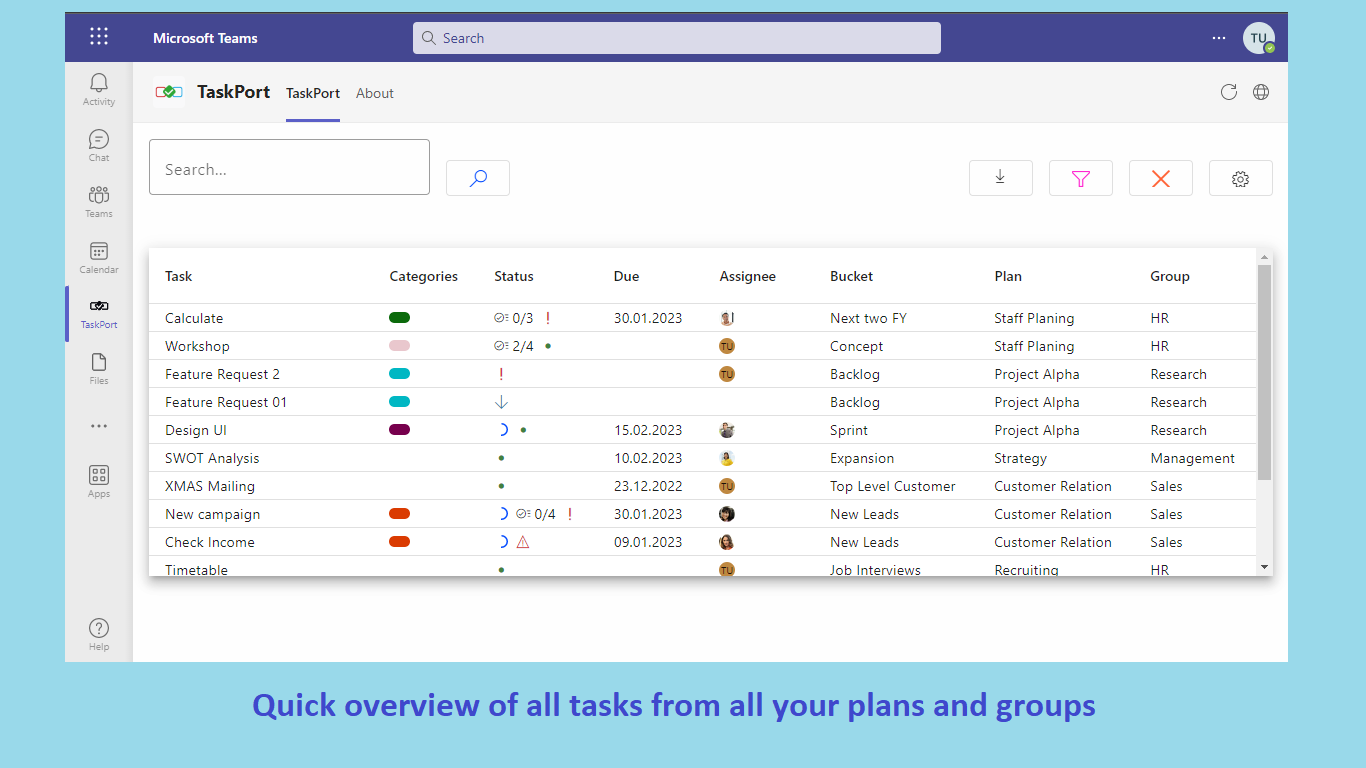
View in the Microsoft Teams app
In full screen mode the navigation shows the two tabs “TaskPort” and “Info”.

The Info tab contains a brief description of the app, information about the publisher as well as links to the product homepage, privacy policy and terms of use.
(Shot gültige Version)
The TaskPort tab displays the task table of TaskPort. All other functions are located on this page.
Clicking on the globe icon on the far right opens TaskPort in a new browser window outside of Microsoft Teams.
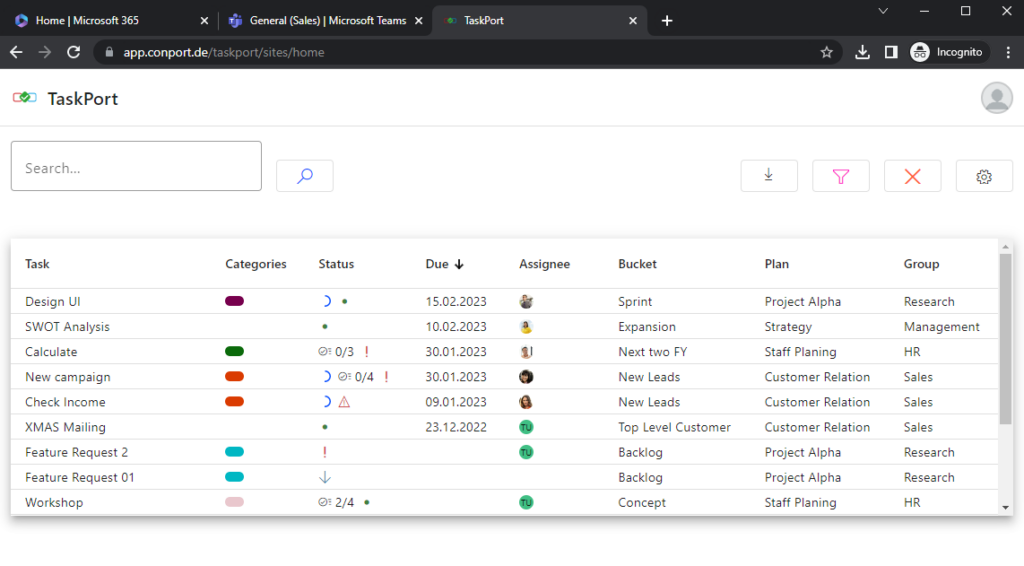
View in browser
In the personal area on the right side of the navigation bar, the profile picture of the logged in user is displayed. Clicking on the profile picture opens a menu that displays the name, as well as a button that allows you to log out.

Tasks in the table
TaskPort creates a table overview of all tasks from all groups and plans to which the logged-in user has access to. A separate table row is created for each task. The following information about the tasks is displayed in the table columns:
| Name | Value | Description |
|---|---|---|
| Task | The name of the task assigned in a Microsoft Planner Task. | |
| Categories | Display the labels assigned to a Microsoft Planner Task | If an individual name has been assigned to a label in Microsoft Planner, this name is displayed in TaskPort when hovering the label. If a label does not have an individual name assigned, TaskPort displays the color of the label. |
| Status | Display the values for the status and priority of a task as well as the already completed elements of an existing checklist | Status: Tasks that have not been started have no marking, a task with the status “in progress” gets a blue semicircle with the help text “50% complete”. Completed tasks are not displayed in TaskPort. Priority: The assigned priority of a task is indicated by corresponding icons and a help text (Low, Medium, Important, Urgent). Checklist: If a checklist is present in the task, a corresponding icon is displayed and the number of items already marked as completed is shown according to the scheme “X of Y”. |
| Due | The due date of a task is displayed here (if available) | The date format is DD.MM.YYYY |
| Assignee | Display of the assigned users of a Task | If the users have stored a profile picture, it is displayed here. If no picture is available, the initials are displayed. By hovering the picture, the name of the user is also displayed, if it is stored. |
| Bucket | The bucket in which the task is located within a plan | |
| Plan | The plan in which the task is located | |
| Group | The group in which the plan is located | The group is always an M365 group. This group can also have a Micrsosoft team. |
Search tasks
To search for a specific task, a search term can be entered in the search field and the search can be started by clicking on the Magnifier button or by pressing Enter.

It is possible to search for:
- Task (Name)
- Assignee
- Bucket
- Plan
- Group
Search behavior:
- All tasks are displayed for which the search term applies.
- It is also searched for subsets (one word out of several, a specific string)
- For assignees the search is done in the first and last name.
- To delete a search, the entered search term must be deleted from the search field AND the
Magnifierbutton must be clicked again. PresingEnterin an empty search field has the same effect.
Sort tasks
The Tasks table can be sorted by the following columns:
- Task (Name)
- Due
- Assignee
- Bucket
- Plan
- Group
These columns show an arrow icon next to the column name when hovered over.

Click on this icon to sort as follows:
- 1st click – Descending sort
- 2nd click – Ascending sort
- 3rd click – Sorting removed
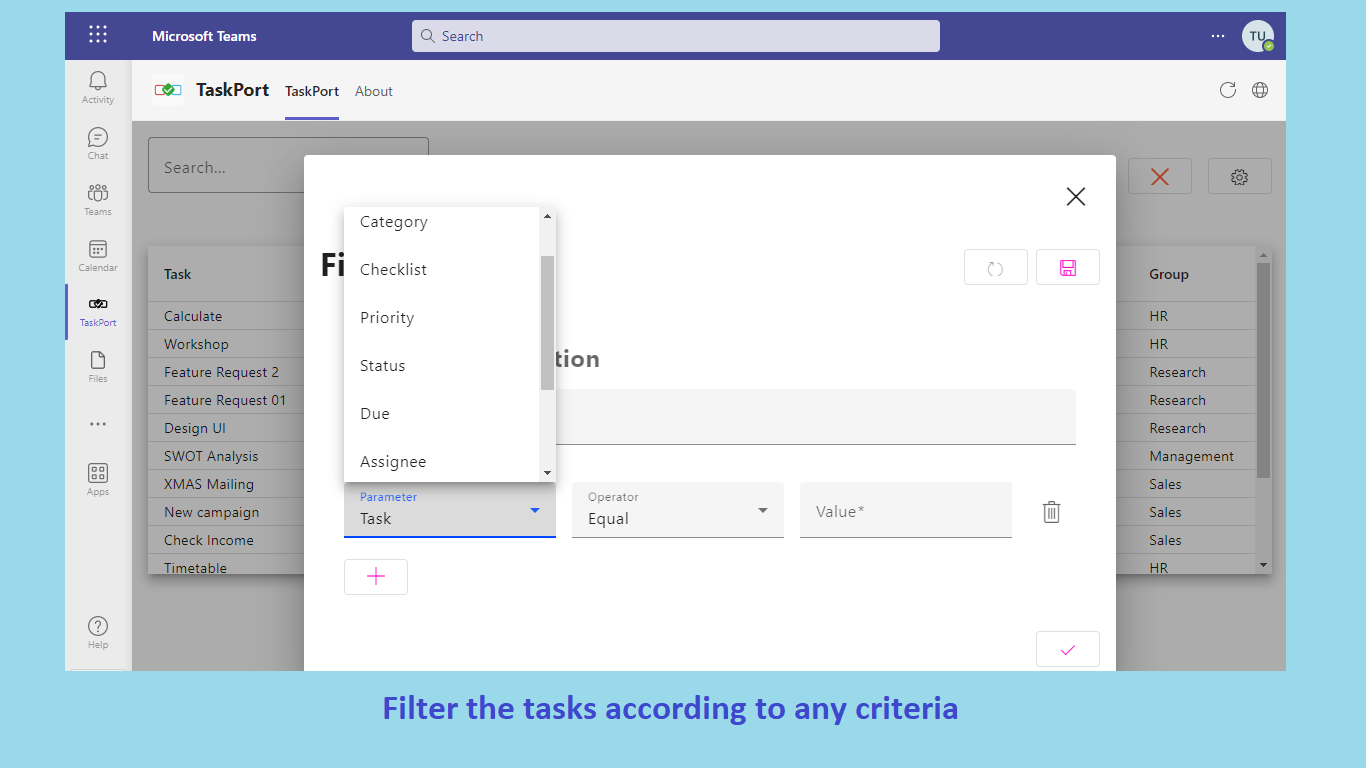
Filtering the tasks
The tasks in the TaskPort table can be filtered according to various criteria and combinations. It is also possible to save filter configurations and reapply them later.
Configure filter
- First, click on the
Filterbutton in the header area to open the filter menu:

- A dialog shows the current filter configuration. By clicking on the
+button (“Add Condition”) a new condition is added to the filter configuration:

- A condition contains the following information:
- Parameter: Select the table column to create a filter for. Note: for the table column “Status”, the values for “Checklist”, “Priority” and “Status” can be selected individually.
- Operator: Select a operator. The common operators are available.
- Value: Enter a value used for filtering.

- A click on the
Checkmarkbutton (“Apply”) applies the set configuration and filters the TaksPort table accordingly. - A notification icon at the
Filterbutton in the header area indicates that a filter is applied. The number shows the number of filter conditions used.

Combined filter configurations
In the configuration menu, any number of filter conditions can be combined into one configuration.
Combine multiple conditions.
- To do this, click on the
+button in the configuration menu to create a further filter line for an already defined filter, in which a new filter condition can be determined as described above - Any number of filter conditions can be combined
- A filter can be removed by clicking the
Trashicon at the end of a line - Clicking on the
Checkmarkbutton (“Apply”) applies the combined configuration and filters the TaksPort table accordingly

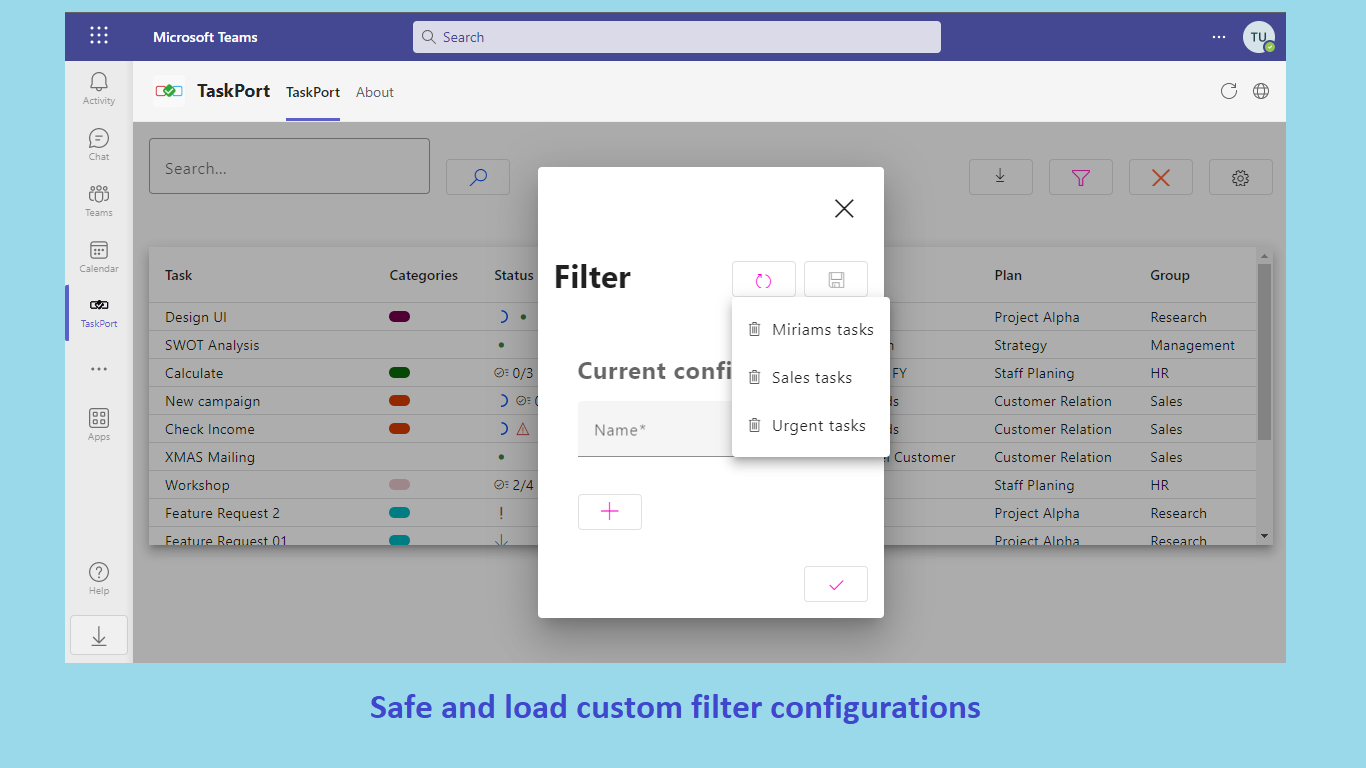
Save, apply and delete filter configurations.
TaskPort allows you to save and use individual filter configurations. This is a particularly convenient way to perform recurring overviews and checks.
Save a filter configuration
- If any filter configuration with one or more filter lines is defined in the configuration menu, saving can be activated by entering a name for the configuration in the
Namefield. - This activates the
Savebutton in the upper right area of the configuration menu.

- Clicking the
Savebutton triggers the saving of the configuration. - A confirmation menu shows once again the name used and the filter conditions.
- With a click on the
hooksymbol in this menu the configuration is finally saved.
Apply a saved filter configuration.
- If filter configurations have already been saved, the
Loadbutton in the filter menu is no longer grayed out but active.

- A click on the
Loadbutton displays all saved configurations. - At this point, a configuration can also be deleted by clicking on the
Recycle binicon. - To apply a configuration, click on its name.

- The saved configuration is then loaded into the configuration menu.
- To apply the configuration, click on the
Applybutton once again.
Remove applied filter
- If the taskport table is filtered by any filter, this can be easily removed by clicking the
Xbutton (“Clear filter”) in the header area

- This removes all active filters and displays the TaskPort table unfiltered.
- Saved filter configurations are not lost in the process.
Limits to the storage of filter configurations.
For privacy reasons, TaskPort does not store user-specific filter configurations centrally but in the so-called “localstorage” of a browser session. This imposes the following limitations:
- Stored filter configurations are only available in the browser in which they were created.
- Similarly, saved filter configurations are only available on the device (PC, laptop, tablet) on which they were created.
- In “Private” browser windows (“Private” or “Incognito” mode), saved filter configurations are not available.
- Deleting the browser cache is harmless, saved filter configurations will be preserved.
- However, if browser cookies are deleted, the saved filter configurations are also deleted!
Settings
In the Settings section you can set some view options for TaskPort. Clicking on the ‘gear’ icon opens the Settings menu.

Adjust height of table rows.
In the Table View area, the height of the table rows can be switched between Normal and Compact.

Configuration of the table columns Clicking on Configure in the Column Settings area opens a corresponding menu:
- As explained in the menu, the columns of the table can be changed in their order or also hidden.
- Clicking on the
Hooksymbol applies the configuration. - Clicking on the
Restoreicon will restore the original setting.
Please note: This setting only affects the current browser session!
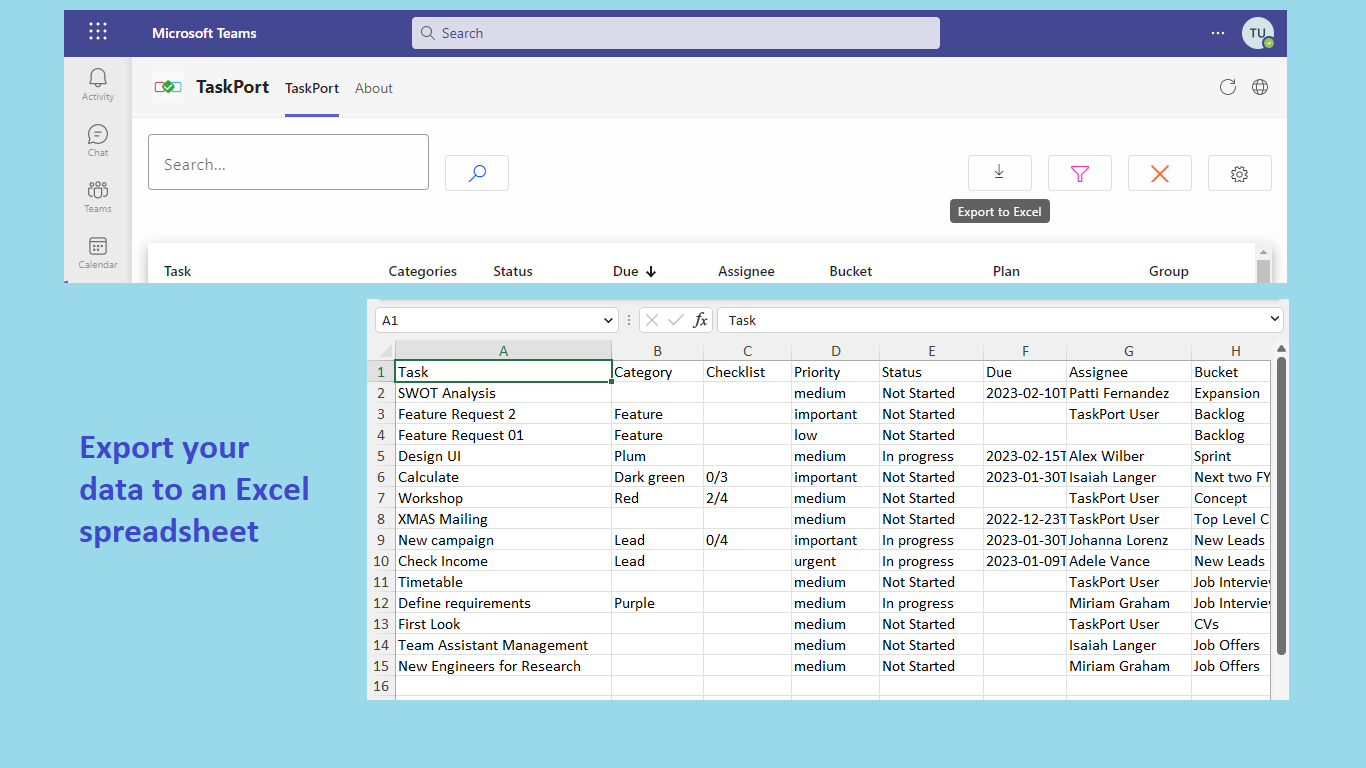
Export to Excel
With the export function the data of the tasks are written into an Excel file with name and format TaskPort.xlsx and this file is stored in the download folder. To do this, just click on the Export to Excel button.

In this way, the task data can be evaluated in Excel, transferred to other systems or used to trigger automated processes.
- In doing so, a previous filtering of the tasks in the task port table is also implemented. The Excel file then also contains the filtered set of data.
- However, sorting of the tasks via the table headers of the TaskPort table is not implemented when exporting to an Excel file. However, this is possible within the Excel file without any problems.
- The properties of a task displayed by symbols in the
Statuscolumn of the TaskPort table are output in the Excel file in separate columns forChecklist,PriorityandStatusrespectively.